An electrical takeoff is the most important step for calculating the overall project cost. Takeoff is the first step, or you can say it is the base of generating an accurate cost projection. However, every process has specific steps that must be executed sequentially to prevent errors. From the project blueprints, experts determine the amount of materials required, labor hours, and other essential elements. Plus, contractors need to calculate takeoff accurately from blueprints to bid and win profitable projects.
However, winning construction bids is not an easy job in today’s competitive industry. Winning requires precise prediction to complete the project successfully under budget and timelines. That is why contractors do not take risks and hire experts for electrical takeoff services and win projects. You must do it too! Now, let us provide you right information on how to calculate electrical takeoffs from blueprints:
LEARN HOW TO CALCULATE ELECTRICAL TAKEOFF FROM BLUEPRINT TO ESTIMATE ACCURATE QUANTITIES OF MATERIAL, LABOR, AND OTHER PROJECT COMPONENTS!
What is an Electrical Takeoff?
An electrical takeoff is a reliable process for building owners and contractors to count the exact amount of project elements. But the condition is that it must be carried out with professionals. Expert quantity surveyors know all the ins and outs of these processes. That is why they are successful are providing accurate blueprint takeoff to their clients. From wire and conduit to fixtures, switches, outlets, panels, and specialized equipment, everything is counted on point. However, the takeoff is the foundation for cost estimation and determines:
- Project feasibility – Whether the project is viable and profitable
- Material purchasing – Exact quantities needed to avoid shortages or excess
- Labor requirements – Time and crew size needed for installation
- Bid preparation – Accurate estimates to win contracts
Understanding Electrical Blueprints
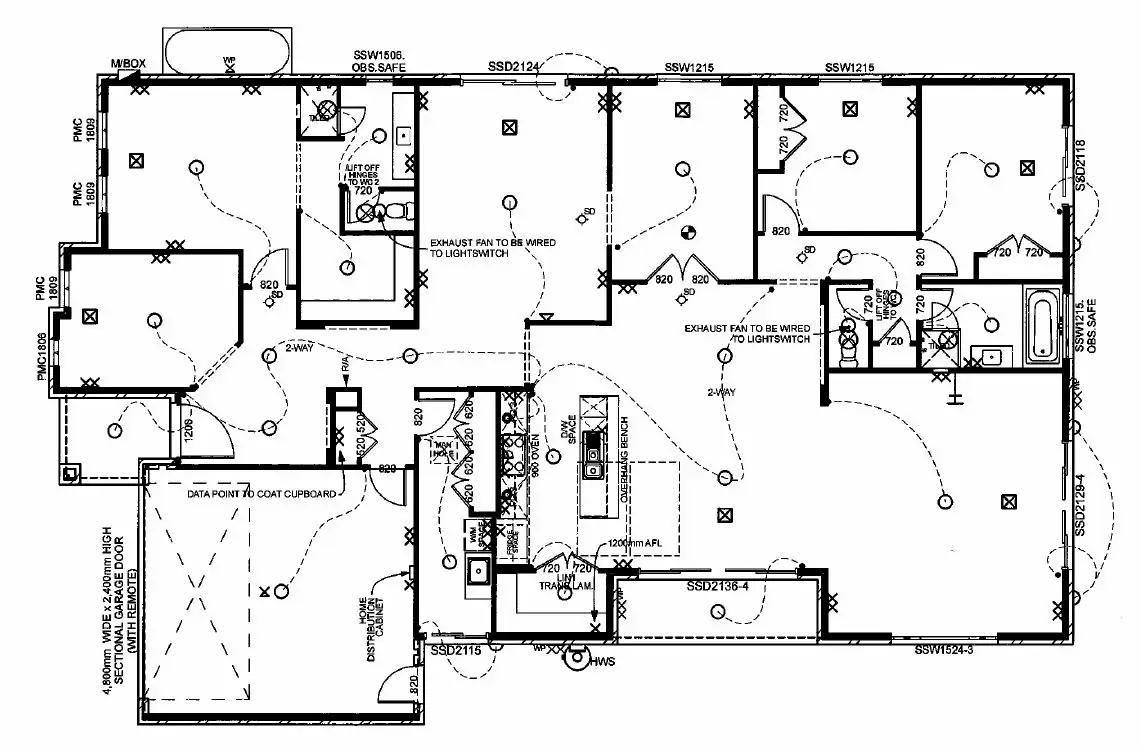
Well, before you start an electrical takeoff process, you must be pro at reading electrical blueprints. Basically, they are the technical drawings of the buildings that consist of special standard symbols, abbreviations, and conventions to communicate electrical system designs.
Key Components of Electrical Blueprints
- Floor Plans show the electrical layout for every floor
- Reflected Ceiling Plans show fixtures, emergency lighting, etc.
- Power Distribution Layout provides details about the panels, feeders, and distribution paths.
- Panel Schedules provide the list of all circuits, their loads, breaker sizes, and what they supply.
- Wiring and Conduit Layout shows routing paths for wires and conduits.
Common Electrical Symbols
- Outlets/Receptacles: Circle with two parallel lines (duplex), variations indicate special types (GFCI, 220V, floor-mounted)
- Switches: Letter “S” with variations (S3 for three-way, SD for dimmer)
- Lighting Fixtures: Circle (basic light), with modifiers for recessed, LED, emergency, or wet location
- Panels: Rectangle, often with lightning bolt or “Panel” label
- Junction Boxes: Square or rectangular marked “JB”
- Conduit Runs: Lines connecting components showing wire paths
Step-by-Step Electrical Takeoff Process
Step 1: Review Project Documents
A professional Construction Estimating Company always starts with a detailed review of all project documentation. Moreover, such experts can analyze electrical features error-free.
Step 2: Understand the Project Scope
Before starting the counting process, you have to look into the building type. You have to look for the information about any special electrical loads or equipment.
Step 3: Organize Your Takeoff
The next step is to organize your takeoff sheets with these categories:
- Lighting fixtures (by type and location)
- Switches and controls
- Receptacles and outlets
- Panels and circuit breakers
- Conduit (by size and type)
- Wire and cable (by gauge and type)
- Special systems (fire alarm, data, security)
- Equipment and transformers
Step 4: Count Fixtures and Devices
For quantifying fixtures and required devices, you can use specific colors to differentiate in the sheet.
Count all fixtures of one type, and mark them with the designated color on the schedule.
For Lighting Fixtures
- Reference the lighting schedule on the plans
- Copy lighting tags to your takeoff sheet
- Categorize by type
- Count each type systematically, marking as you go
- Note wattage, mounting height, and special requirements
For Switches
- Count by type
- Note any special switches
- Record location and height requirements
Step 5: Measure Conduit
Use specific items to take measurements from drawings. For conduit, you can measure circuit runs from panels. After that, add drops at each switch and connection point. Do not forget to include extra length for connections.
Step 6: Calculate Quantities
After measurements, determine total quantities. To prevent overspending, you need to account for waste factors. Consider overlap, shrinkage, and cutting waste. For labor, multiply the labor unit by the burdened labor cost to determine the labor cost for each task.
Step 7: Price Materials and Labor
For estimating materials and labor, it is highly recommended to contact multiple suppliers. This way, you can select the most suitable one. Also consider price fluctuations. If you buy things in bulk, then you may get good discounts. Moreover, do not neglect other direct costs that are:
- Equipment rentals
- Permit fees
- Subcontractor services
Conclusion
However, calculating electrical takeoff from a blueprint requires specific skills and learning. One must have technical knowledge of reading blueprints. Keep in mind that a minor mistake in reading can result in over-budgeting and construction delays. Plus, if you still rely on manual methods, you can never compete in this contemporary industry. So, use modern takeoff techniques to quantify every project element.